Monday, February 16, 2015

Breaking down and rebuilding

I hit a bit of a stump motivation-wise after my last few attempts of getting a 3D artist job  didn't work out, I have to say I got discouraged and needed a break. I started working in QA as opposed to art due to the simple need to survive and the will to make it on my own. I needed to distance myself from 3D for some time as I felt like I was beating my head against a wall and needed a break to regain passion and motivation. I am finally working at Eidos Montreal which is where I always wanted to be as an environment artist, but being in QA there and seeing the amazing work that people there do is really quite motivating. Finally as I adapted I promised myself this new year that I am not going to give up and I will keep pushing and will keep my dream alive and so I resumed work with my Deus-Ex, Megan Reeds office piece, and the timing I would say was pretty good as there might be a position opening up soon, although I should have probably started pushing myself sooner, but this I think is the kick in the butt that I needed so much. Even though I haven't spent as much time in an environment production as desired for the position I sincerely hope that my efforts will not go unnoticed. I am challenging myself to put fourth all my effort after work and on weekends in order to Finnish up this piece in the next 2 weeks so I can give my application with more recent work. So the purpose of this post is to update on what I have done since the new year as I have promised myself to systematically keep working on this project.


 The only new things here are the two chairs and the couch, they are still untextured. This is probably the last screenshot I will make in UDK as my plan is to migrate this whole project into Unreal Engine 4, which I still need to learn in these two weeks. Since I am pretty comfortable with UDK I am hoping the transition will not be too difficult.


As part of my commitment to resume work I picked up myself a new piece of software (Substance Designer 4), and started learning it. I have to admit once I got used to it I find it really useful. It is a node based texturing application that acts as a middleman between 3d app, 2d app and the engine. The next screenshots will be presented in Substance Designer, I plan on using this software for the remainder of this project.


I wanted to limit myself to how many high-poly objects I will model for this scene as I want to be as efficient as possible. However this chair I felt like is one of the more attention grabbing objects in this scene so I think it needed a good highpoly and so I made one in combination of 3D max and Zbrush, made topology in topogun and this was the first object to go through baking and texturing in Substance Designer.


The console stations were a big part of me learning SD, as they contain a variety of materials and everything is sharing one texture. All the normal details were created using nDo2. 

That's pretty much what I am starting my challenge with, my next task is to populate the tables with some of objects. More specifically microscope and the computer set (for the next update). After that I want to start migrating the objects into UE4.

Thursday, August 29, 2013

Art test and more updates

I was fortunate to get an art test from a local company this weekend, so I took a short break from this project to do that. It's a fun stylized piece and I am pretty happy with the result and managed to submit it a day early, however I still feel a bit like I am hanging in limbo as I haven't heard anything yet. I really hope to get this position


As part of the requirements I had to write a breakdown of my workflow, so i am going to post up a link here.

After the test I took a couple of days for R&R, and now I am back on this project. So here is a progress shot.


I added the furniture, all of this furniture is using one texture sheet, I achieved this by makng most of the textures tile in one direction. I also changed the reflection to scene reflections, so that's why the specularity on the floor got way toned down, however I am hoping to remedy this once I add the actual screens. Lighting is not finished yet either, but it's good enough for now. I will refine it more closer to the end. I am not really happy with the ceiling so I'll have to change that down the road, however I want to fill out the scene, and get the overall feeling right for now.

Wednesday, August 21, 2013

Megan's Office - 1st update


I took my blockout from UDK, moved it to 3dMax, and there started to refine my modular pieces. I think now the most important part for me is to get the right feeling of the room. So I started by creating textures, first for the floor, then the walls and supports and finally the ceiling. Not 100% sure if I'll be going ahead with this ceiling yet. The main thing like I said was nailing the basic room construction and layout. From then on I refined the lighting. I think it's easier to do it at this point because there are practically no assets so 1.they do not distract me 2. lighting renders much faster. From then on I went in and started refining the textures. Floor is pretty close to being done. Might need to spend a little more time with wall textures, supports and the ceiling.

Tuesday, August 20, 2013

Deus Ex - Megan Reed's office


So I have been applying for work all of last week, so my hands are really itching to start doing some work again. I got some great advice from an art Director from a local company who suggested that I focus more on realistic work as that seems to be my strength and most AAA companies are looking for that anyways. I want to start targeting companies better with my projects from now on so I wanted to make a scene from a concept from one of my favorite games and a company I would love to work for some day: Deus Ex. Megan's office was my choice because I found it so very interesting and there is all sorts of skill to practice and show here. Modularity for the floor, walls, ceiling and tables, and i was thinking of reusing the pieces from the table to make the shelf, then there is some Interesting high polies to make, the arm chair being the main thing, where I could do some sculpting. and things like the console and the microscope (or is it a coffee maker? can't decide). Also there is plenty of texture planning and lighting to be done so I think it would make for a pretty strong piece overall.

Realistically speaking I think I could get it done in about 3 weeks, there is plenty of assets and I have to keep looking for a job still so I plan on dedicating about 20% of my day applying for work and the rest working on this. Applying for work is a bit stressful and kind of a confidence killer for me at this point, where as I really enjoy just doing those 3d projects and they make me feel at peace, because I know that I have the skills when I do the work, maybe just not as polished yet, but that's why I have to keep trying.

I know it's not really good that I started 2 projects here already and seems like I am abandoning them. I felt like my piece with the collapsed bridge didn't have a solid direction, so I decided to leave it for now. Not sure if blending in a concept with some work that I've done was the best idea as my bridge almost felt out of place. Maybe in the future I'll refine the concept and come back to it, but for now I have to leave it. Same goes for the wrecked ship, as it is stylized and I am going to take the advice and make something more realistic, targeting local companies more with my work. But enough talk, here is the concept that I used, I looked at the game and it seems that they made Megan's office a bit different so it's fair game, I am going to try and replicate the concept in 3D to the best of my ability. So here it is: 


Concept art I will be working from:


Here is some planning work as in how I am going to break down this scene:


Basic blocking in UDK of main shapes and lights:


And the lighting rig I have for now:
Main light sources: big screen, medical display
secondary lights: window (drops some nice shapes but doesn't light the scene overall), smaller screens, and top lights which seem to be rather dim. Since the screens are the main light source I feel it is one of the things that give the scene a sci-fi feeling.


Wednesday, August 7, 2013

Big Update


Haven't posted here in a while so here comes a big update. First of all I want to talk about the piece that I made for the art test. I spent some more time on it after I completed it to add some effects a polish up the textures so here it is.


Also here are some screenshots of the highpoly models I used for this scene.
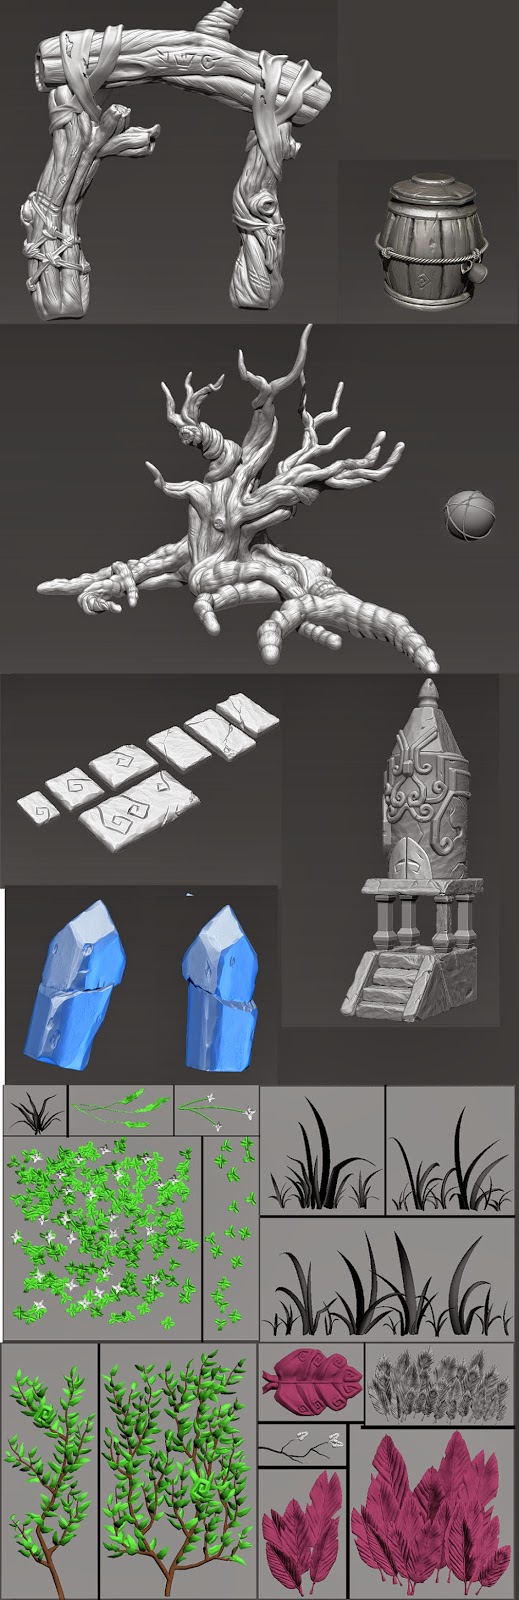


Lots of practice with Zbrush, I also polypainted the models so this would be my first stylized hand painted scene. The basic process was this first day I blocked in the most of the scene in 3D max. The reason I'm saying most because for organic assets like the tree I started out directly in Zbrush because I find it easier to get organic shapes that way. After that I spent about a day per asset detailing it out in Zbrush. After that a day per asset to polypaint it for the major assets. The reason it took so long is because it was my first stylized scene and I really wanted to get it right, so I was watching a lot of tutorials, mostly from 3d motive to get it. The exception would probably be the foliage where it took probably two days to get it all done. After the bake i put it all in engine and the scene was ready for submission for the test, however not ready for my portfolio yet. I guess the main part of upgrading the textures, and I should have done it in the first place was having an nDo2 pass for additional occlusion and cavity maps and that really helped out the textures. Also I spent some more time on specular maps and polishing up the textures in Photoshop. So all that polish took a couple more days. Lastly I went deeper in UDK learned some more about materials so that my textures worked together with it. I also learned some special effects to make the scene feel alive. First thing was making the foliage move with the wind in order to make the scene feel alive. And that was achieved by using the material, specifically having wind direction and speed node and the world position node feed into the sine wave which would be interpolating wuth the reverse sine wave using a third sine wave of a different period as the alpha, after it has a few more interpolations with other sine waves to break up the movement even more, this technique uses vertex color to mask which parts will be moving. Another important note about foliage is that it uses phong lighting model within the material instead of relying just on scene lighting to give it more vibrant looks, and otherwise the backfaces come out dark. I learned the technique from the 3dmotives foliage tutorial. I used a very similar technique to animate things like cloth on the wooden gate as well as the glowing spheres on the tree. Another fairly big shader I set up was the crystal shader. But it pretty much just consists of a network of panners, rotators and a little bit of sine wave controlled by an additional mask texture where the 3 channels gave different glow effects, as well as on one of the specular channels I controlled which part of the crystal is going to glow.  Another effect that I added is the fireflies, that is basically a particle effect using the orbit function in cascade. I have about 4 of those effects in the scene: main one for the entire scene, and three smaller effects around the glowing spheres to give the impression of the fireflies gather around the lights. The last effect was a fog volume I added on top of the distance fog, and I used again my effects texture that i used for the crystal because it has 2 different clouds in those channels which was perfect for creating a moving fog.

Some more work that I've done that I want to share, a concept for a little competition on one of the linked in groups:


Basically the theme was to create a keg of your liking, and that was the only guideline. Goblins always seemed really whacky to me, almost like they are drunk, so I wanted to create a keg for them. Maybe I'll model it in the future, haven't made up my mind about it yet. And some more work that I started to do. Another stylized scene, this time following my own concept so sketches down below. 

 Some silhouette studies of shipwrecks


 Silhouette studies for the composition of the set


I liked the middle one so here is a concept for it


And finally some highpolies


Thursday, June 6, 2013

Stage 1 Blocking


So I a bit of planning and blocking out yesterday and monday. I started out just blocking things in UDK with BSP's keeping things rather large and on grid to make sure everything fits. Exported it to max and created basic blockout models which I then sent back to UDK and replaced all the BSP stuff with static meshes. Also made some placehoder materials and textures . Rather basic now, I will also need to add things like support pillars for the buildings, foundation and trims, and after that I'll be ready to dive into detailing out the assets. As long as i maintain dimensions everything should just snap into place and fit together well. I also plan on integrating the bridge supports into this scene so right now as they are the only finnished assets they stand out quite a bit. Also textures on them look way to saturated in UDK but that's and easy fix inside of the shader. 


I think I'll be stepping back from this piece for now as I saw an awesome opportunity on one of the LinkedIn groups I just got accepted in: an open art test with the possibility of maybe paid internship. The image looks like a really fun exercise, with lots of Zbrush happy-times . I usually don't do this kind of cartoony style so it should be an interesting challenge. I like learning new things, with every piece I try to learn something new, so this looks like the perfect exercise even if I end up not getting the position. Ahh lot's of things to do.


Monday, June 3, 2013

Bridge support and further plans


 So here is the bridge support. I decided to try out dDo in making of the texture. It’s a really nice program, there are still some bugs and quirks because it’s in beta, however it’s still pretty solid, and saved me a lot of time during texturing, especially for things like wearing of the edges, and because a lot of the things are automated it’s easy to quickly try out different things. I think I will be using this program in the future for texturing assets, as it makes things much faster and more efficient.

 I like the direction the bridge is going in and decided to make an entire environment for it, and practice some modularity. That’s the reason why I decided not to texture the concrete part of the bridge for now as it requires an alpha channel and for optimization purposes I want that texture shared with other assets that would also require an alpha such as vegetation and decals. My aim in making the rest of the environment is make things as modular as possible so there will be a lot of texture sharing. Here is the list of textures I plan to have for the entire environment:

-          Bridge support texture: hero asset
-          Concrete (bottom of bridge, walls, rubble)
-          Road pavement
-          Metal (wall plates, miscellaneous assets)
-          Texture with alpha for: broken part of concrete, broken pavement, vegetation, decals.
-      Glass elements (for windows)
-      Miscellaneous (signs etc.)


Also textures to be used in UDK for vertex blending:
-          Rust
-          Paint
-          dirt

My aim is to finish this project by next week Wednesday, which gives me a week and a few days to polish up the scene. As inspiration I would be using the first concept that I posted, however I am not going to make the scene looking exactly like the concept, the concept is more of the idea, however I will be improvising as I go to make the scene look unique.

Here are the textures of the bridge support: